Home
Categories
Dictionary
Download
Project Details
Changes Log
What Links Here
How To
Syntax
Wiki usage
Tutorials
FAQ
License
Header tutorial
1 Add the image to be put in the header
2 Insert the image in the header
3 Customize the styleSheet of the header
4 See also
2 Insert the image in the header
3 Customize the styleSheet of the header
4 See also
This article is a tutorial which explains how to customize your header. You will:
In the next step, we will customize the styleSheet of the header to have the correct height.
Let's add the following CSS file:
Now we have the following result:
- Add an image in left the header
Add the image to be put in the header
To use an image we must add it to the image files. For the sake of this tutorial we will ensure that we have an image of height 50px and add it, such as for example:<images> <image id="ball" url="ball.jpg" /> <image id="hand" url="hand.png" /> </images>
Insert the image in the header
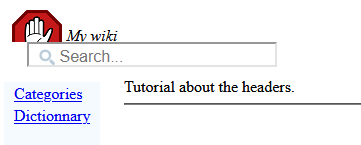
We will insert the image in the header with theheaderImg element:<header right="The right message"> <headerImg id="hand" height="50px" />> My wiki </header>Unfortunately the height of the header is too small for the image, and we have the following result:
In the next step, we will customize the styleSheet of the header to have the correct height.
Customize the styleSheet of the header
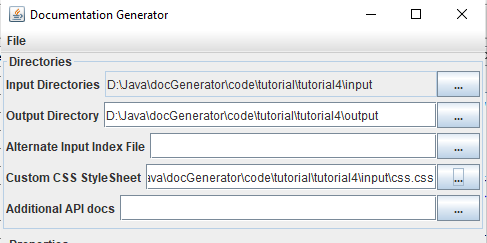
We will add a Custom StyleSheet and use it for the hader to specify the height of the header.Let's add the following CSS file:
   iframe.header {
     height: 70px;
   }
Now specify this CSS file in the generator GUI:
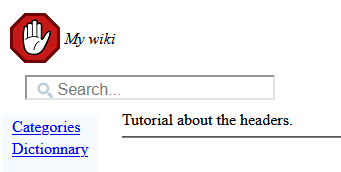
Now we have the following result:
See also
- Second tutorial: This article is a tutorial which explains the concepts of images and resources
- Tutorials: This article presents a list of tutorials
×
![]()
Categories: Tutorials
